Ansible 스터디 2주차 반복문과 조건문, 롤과 콘텐츠 컬렉션
반복문
만약 어떤 서버들이나 전체 서버들에서 특정 서비스가 올라와 있어야 하거나, 꺼져 있어야 한다면 service 빌트인 모듈을 활용하여 일괄적으로 원하는 상태로 바꾸어 줄 수 있다.
check-service.yml
---
- hosts: all
  tasks:
    - name: Check sshd state
      ansible.builtin.service:
        name: sshd
        state: started

    - name: Check chronyd state
      ansible.builtin.service:
        name: chronyd
        state: stopped
만약 전체 서버에서 sshd는 반드시 실행되어 있어야하고, chronyd는 꺼져 있어야 한다면 위와같이 yaml파일을 작성할 수 있다.
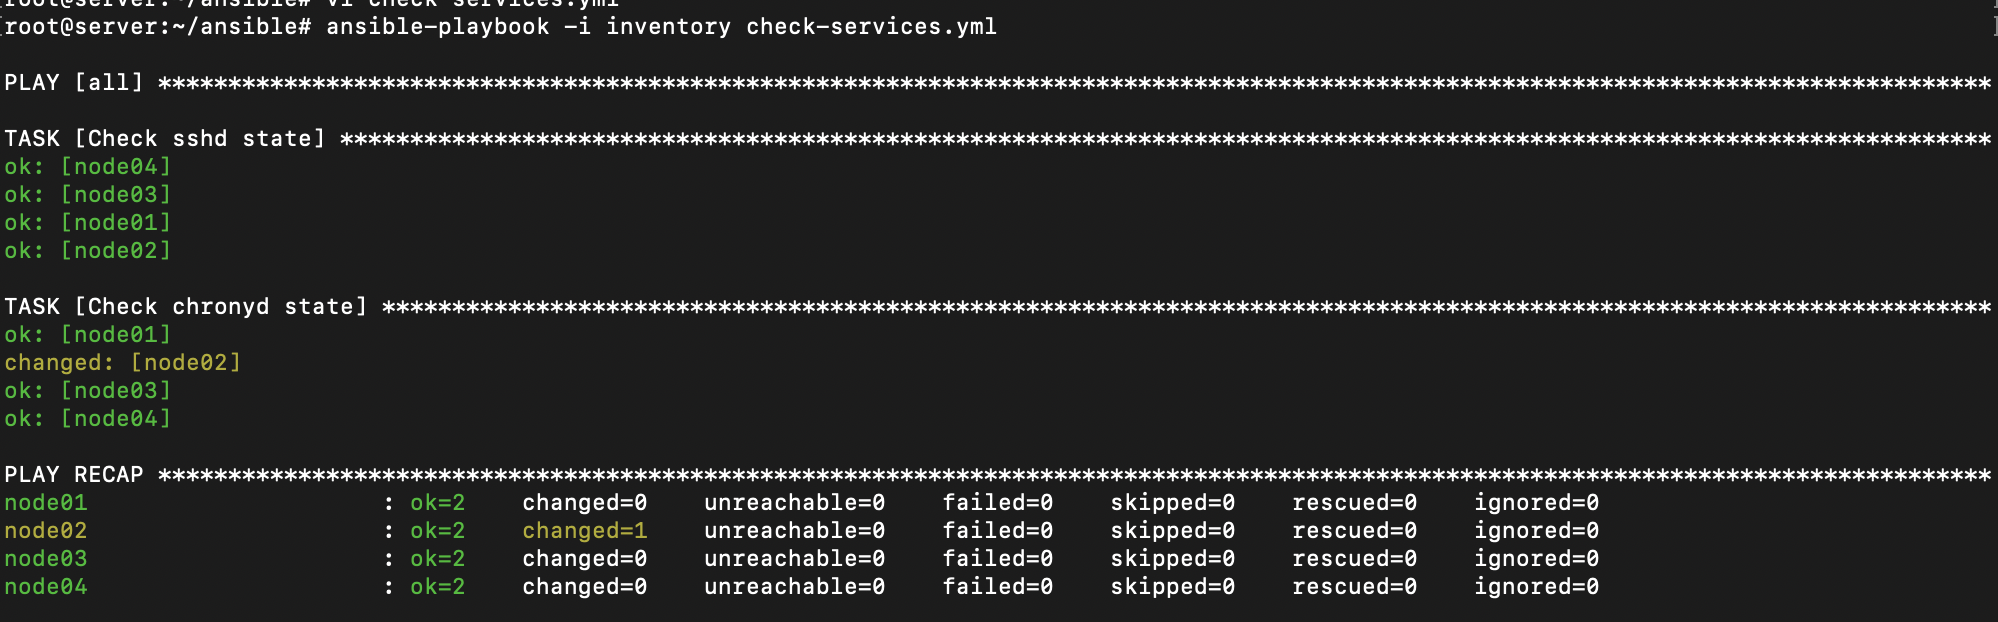
Node02의 경우 chronyd가 꺼져있어야 하지만, 다른 상태로 되어있어 ansible이 변경해 준 모습을 볼 수 있다.
위 yaml파일과 같이 서비스 하나마다 하나씩 작성하여 실행할 수 있지만, 만약 체크해야하는 서비스 수가 많다면 변수와 반복문을 활용하는게 정확하고 효과적으로 작업을 할 수 있다.
check-service2.yaml
---
- hosts: all
  vars:
    mustStart:
      - sshd
      - chronyd
  tasks:

    - name: Check started state
      ansible.builtin.service:
        name: "{{ item }}"
        state: started
      loop: "{{mustStart}}"
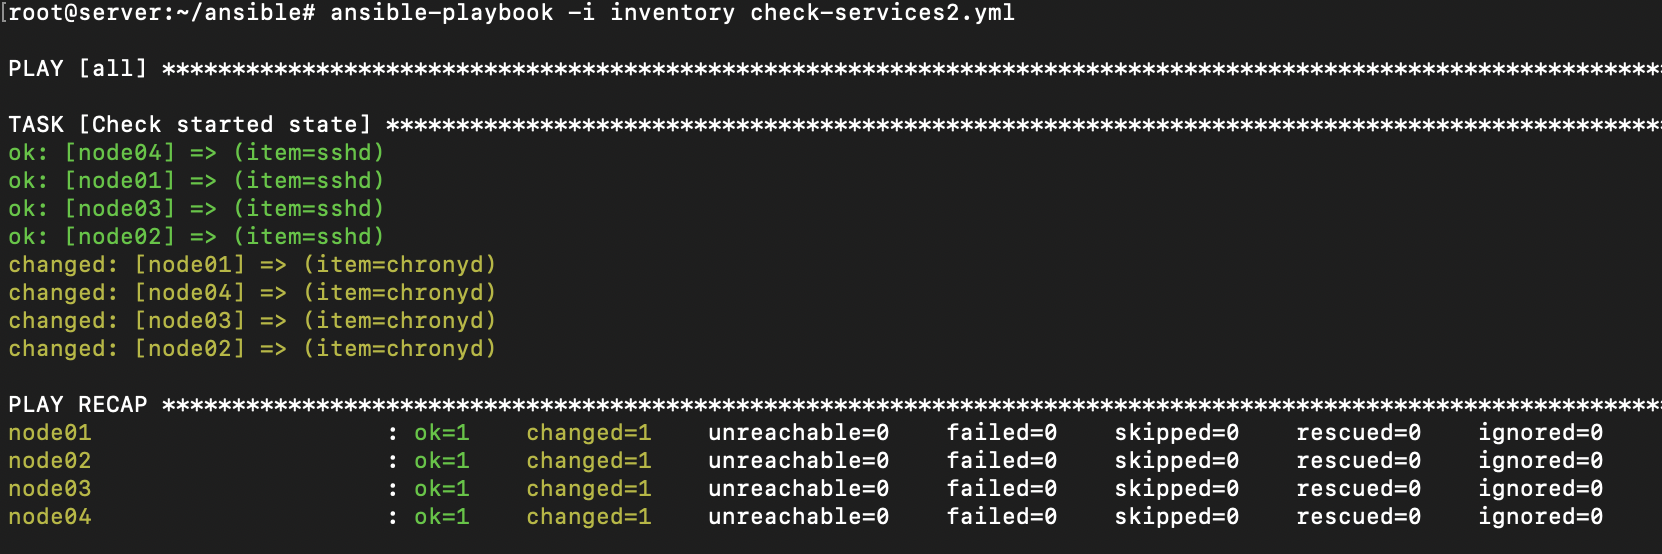
ansible이 check-service.yml에서 껐던 chronyd를 모두 start로 변경하였다.
공식문서를 통해 service의 어떤 state를 ansible에서 활용할 수 있는지 알 수 있다.
ansible.builtin.service module – Manage services — Ansible Documentation
Forces a ‘global’ task that does not execute per host, this bypasses per host templating and serial, throttle and other loop considerations Conditionals will work as if run_once is being used, variables used will be from the first available host This a
docs.ansible.com
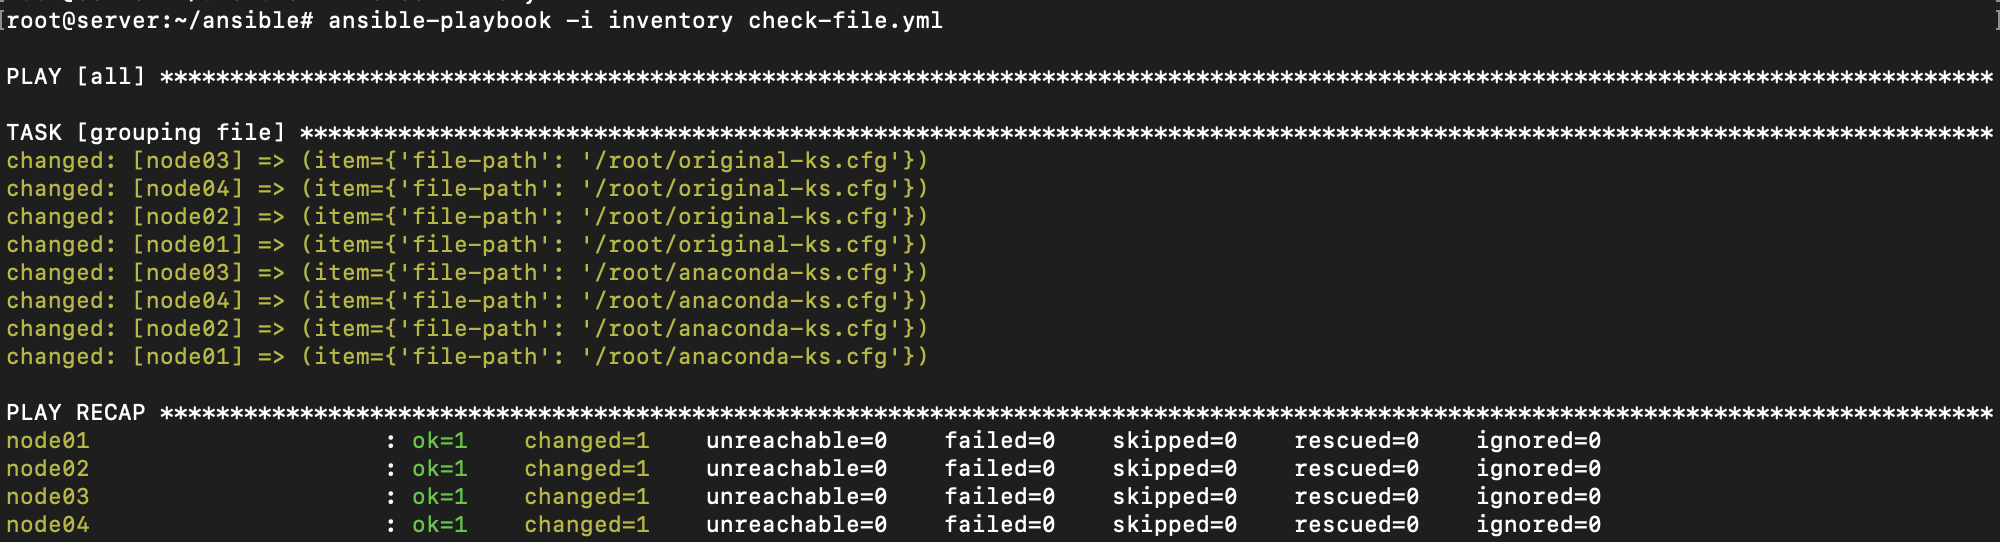
또한, file모듈을 활용한다면 서버들에게 공통적으로 가지고 있는 파일의 owner나 권한을 변경하거나 파일을 생성 또는 삭제도 할 수 있다.
check-file.yml
---
- hosts: all

  tasks:
    - name: grouping file
      ansible.builtin.file:
        path: "{{ item['file-path'] }}"
        owner: operator
        mode: '1755'
      loop:
        - file-path: /root/original-ks.cfg
        - file-path: /root/anaconda-ks.cfg
make-file.yml
---
- hosts: all

  tasks:
    - name: Create files
      ansible.builtin.file:
        path: "{{ item['log-path'] }}"
        mode: "{{ item['log-mode'] }}"
        state: touch
      loop:
        - log-path: /var/log/test1.log
          log-mode: '0644'
        - log-path: /var/log/test2.log
          log-mode: '0600'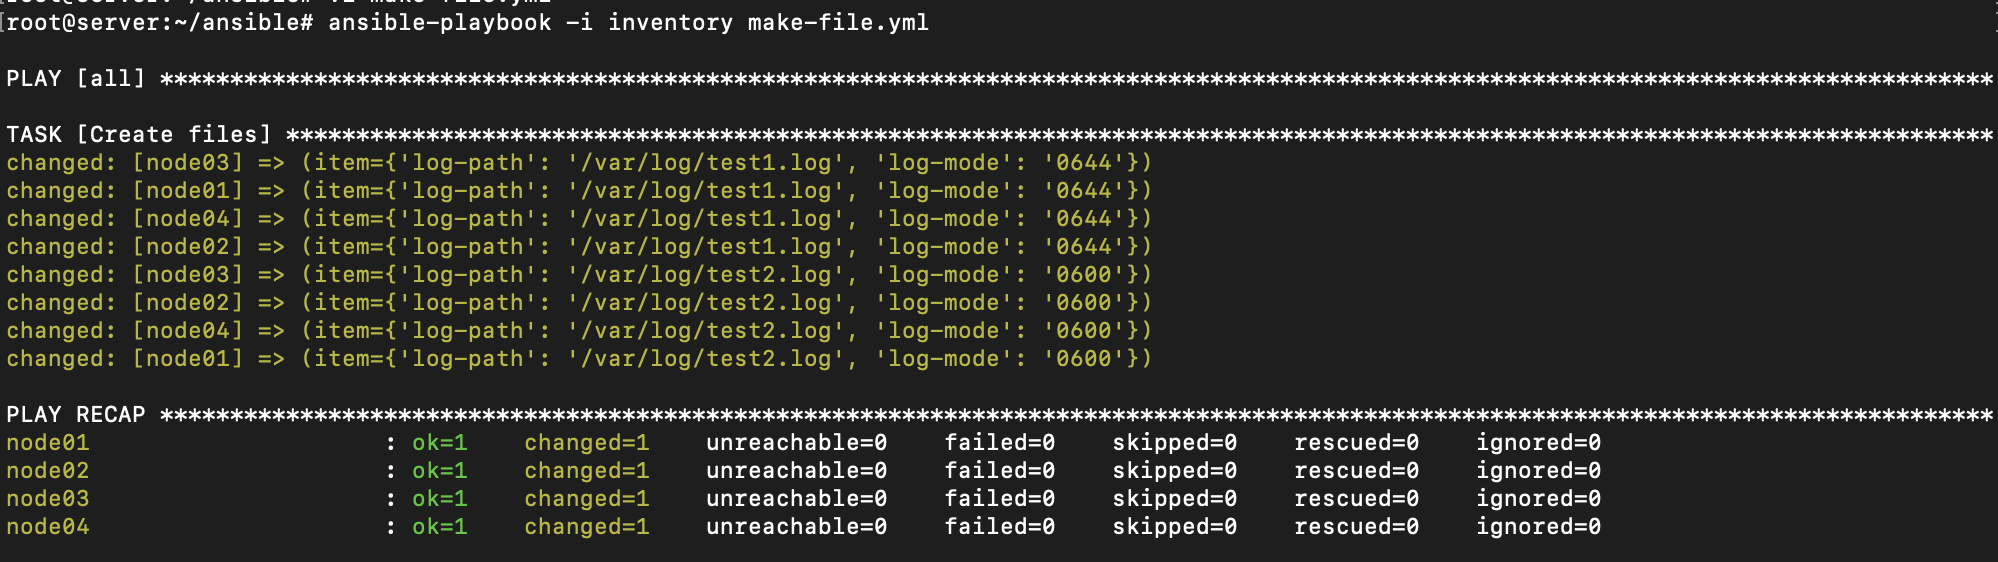
state: touch인 경우 파일이 생성될 것이고 state: absent 인 경우 삭제될 것이다.
만약 아이템이 여러개가 있다면 Loop문에서 dictionary로 사용하여 해당 아이템의 변수를 따로 사용할 수 있다.
make-file에서의 예 ) "{{ item['log-path'] }}"
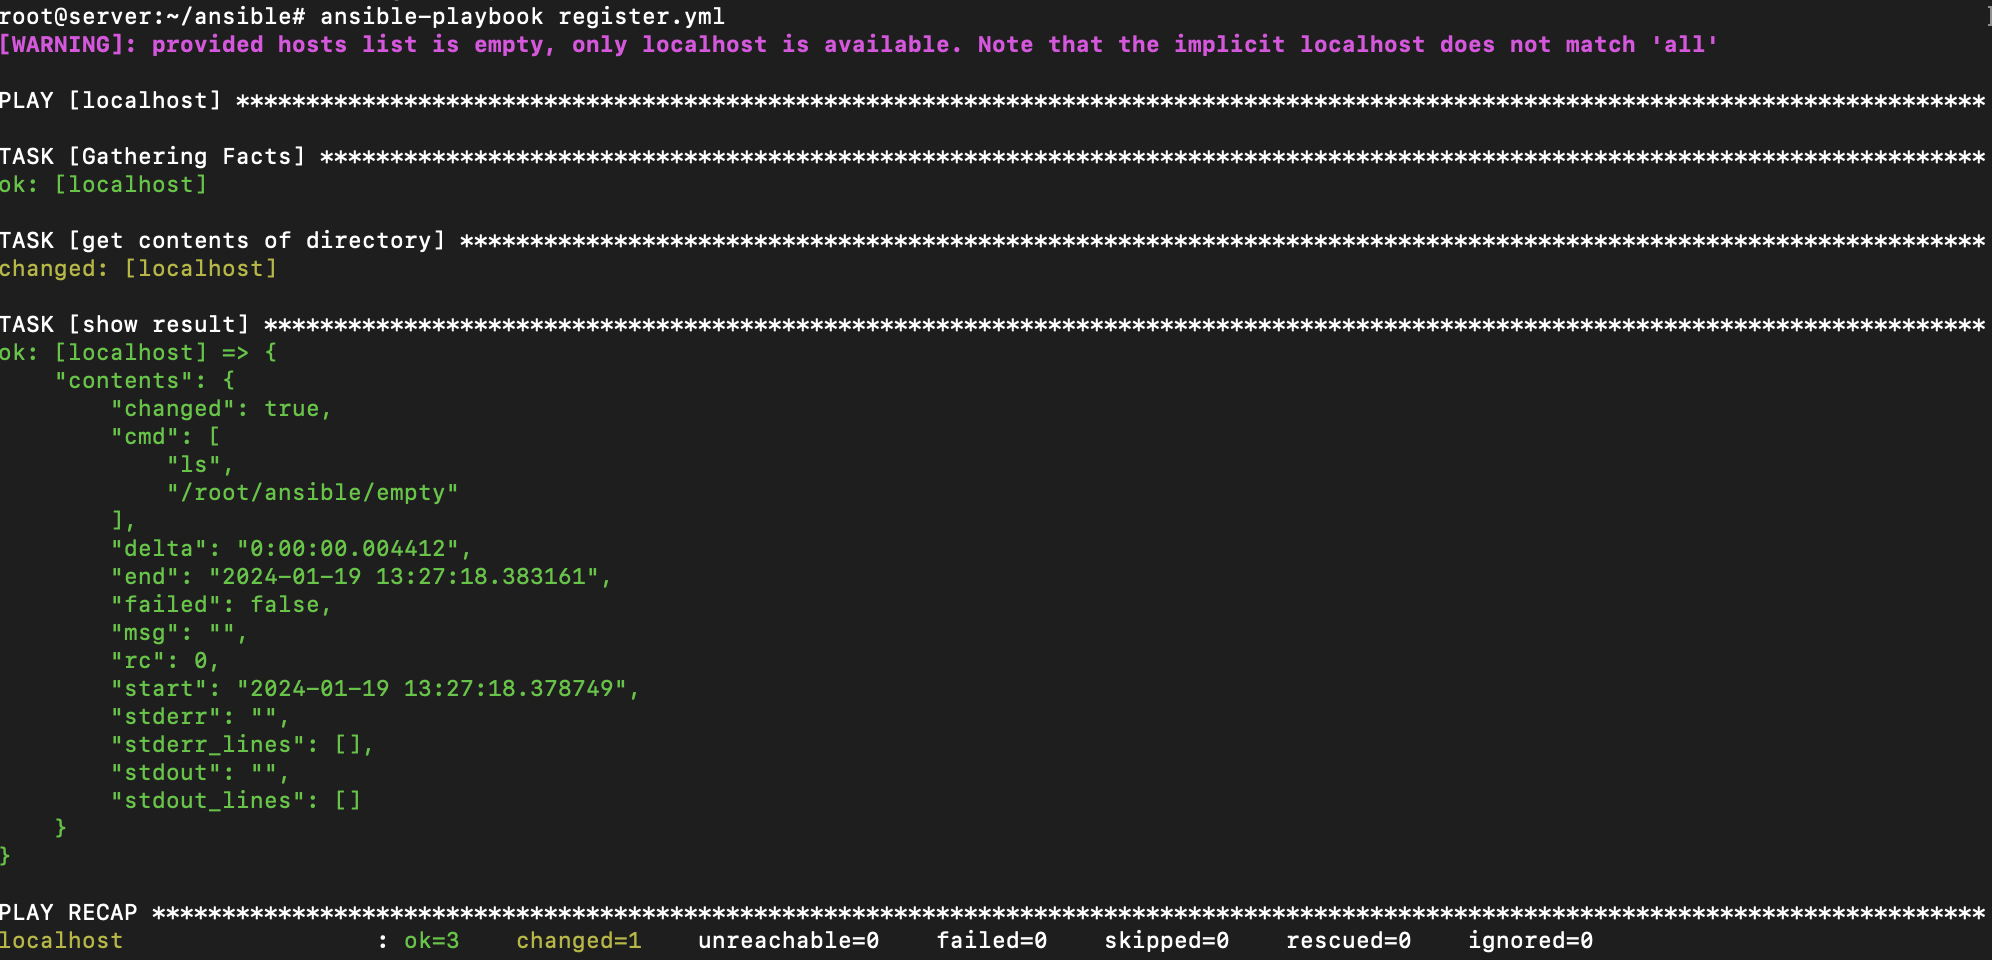
register 변수는 해당 task에서 출력되는 결과를 임시로 저장해두어 사용할 수 있다.
실행시간, 끝나는 시간, 걸린시간, 에러여부, stdout, stderr등 여러값들이 저장되어 활용할 수 있다. 결과값은 key-value 페어로 저장된다.
register내의 값들은 debug모듈을 통해 확인할 수 있다.
register.yml
---
- hosts: localhost
  tasks:
    - name: get contents of directory
      command: ls /root/ansible/empty
      register: contents

    - name : show result
      ansible.builtin.debug:
        var: contents
조건문
저장된 변수를 활용하여 특정 조건이 충족될 때 작업 또는 플레이를 실행할 수 있게 설정할 수 있다.
예시로 특정 directory에 아무 파일도 없으면 파일을 생성하라는 task를 작성할 수 있다.
register.yml
---
- hosts: localhost
  tasks:
    - name: get contents of directory
      command: ls /root/ansible/empty
      register: contents

    - name : touch when folder is empty
      ansible.builtin.file:
        path: /root/ansible/empty/touch
        state: touch
      when: contents.stdout == ""
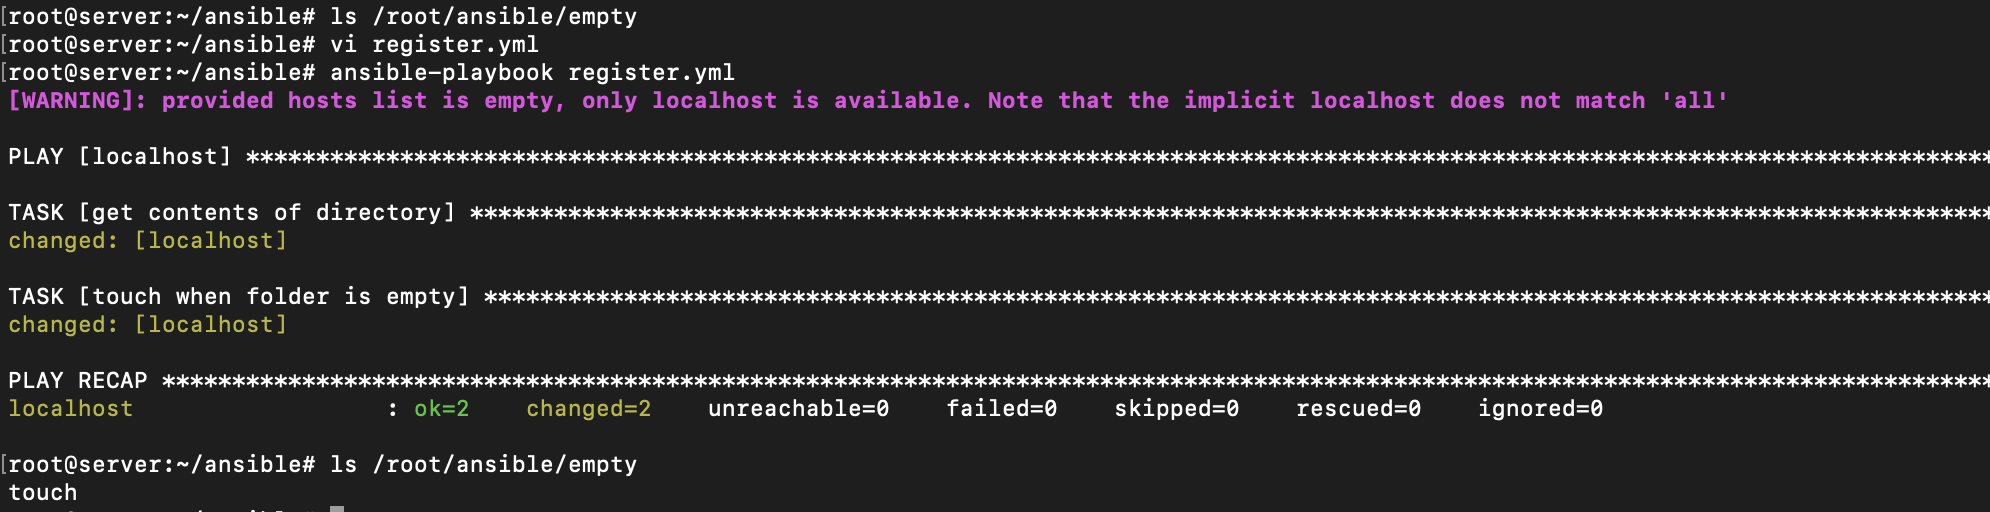
비어있던 디렉터리에 touch라는 파일이 생성되었음을 볼 수 있다.
when: 에서 and 와 or을 활용하여 복수 조건문을 활용할수도 있다.
check-os.yml
---
- hosts: all
  tasks:
    - name: Print os type
      ansible.builtin.debug:
        msg: >-
             OS Type: {{ ansible_facts['distribution'] }}
             VM Type: {{ ansible_facts['virtualization_type'] }}
      when: >
          ( ansible_facts['distribution'] == "CentOS" and
            ansible_facts['distribution_version'] == "7" )
          or
          ansible_facts['virtualization_type'] == "kvm"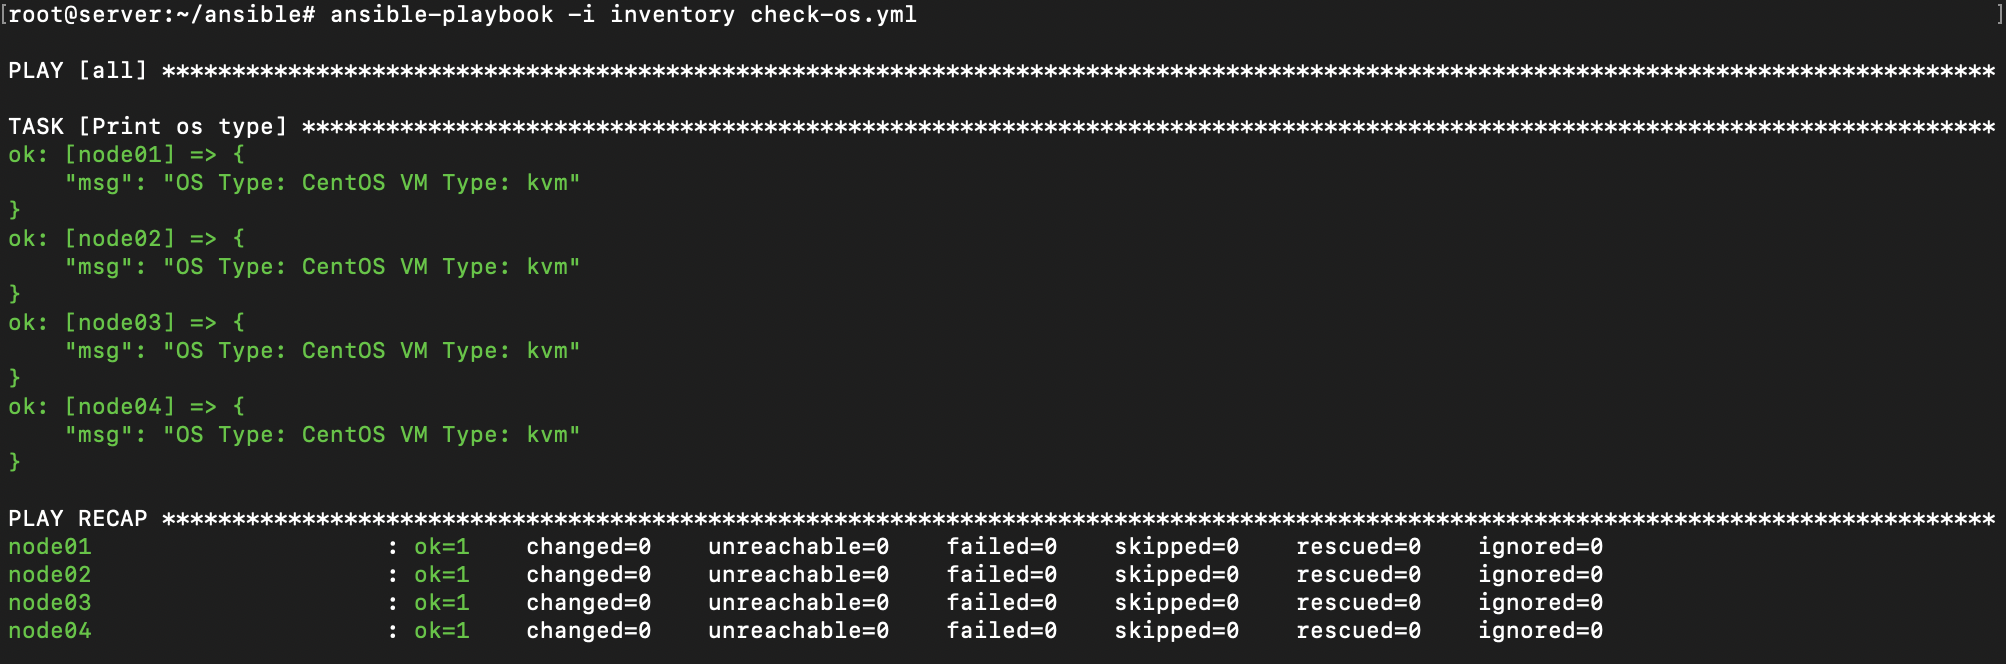
핸들러 및 작업 실패 처리
앤서블은 기본적으로 서버들의 멱등성을 가지도록 동작한다. 때문에 플레이북을 여러번 실행해도 항상 결과는 동일하며 play 및 task를 여러번 실행하여도 호스트는 원하는 상태가 되는데에 필요한 경우에만 변경된다.
하지만 한 task에서 변경작업을 할 때, 예를들면 서비스의 config를 변경하면 변경사항이 적용 되도록 서비스를 다시 로드해야 하는것 처럼 추가로 작업이 실행되어야 할 수도 있다. 이때 핸들러는 다른 작업에서 트리거한 알림에 응답하는 작업이며, 해당 호스트에서 작업이 변경될 때만 핸들러에 통지한다.
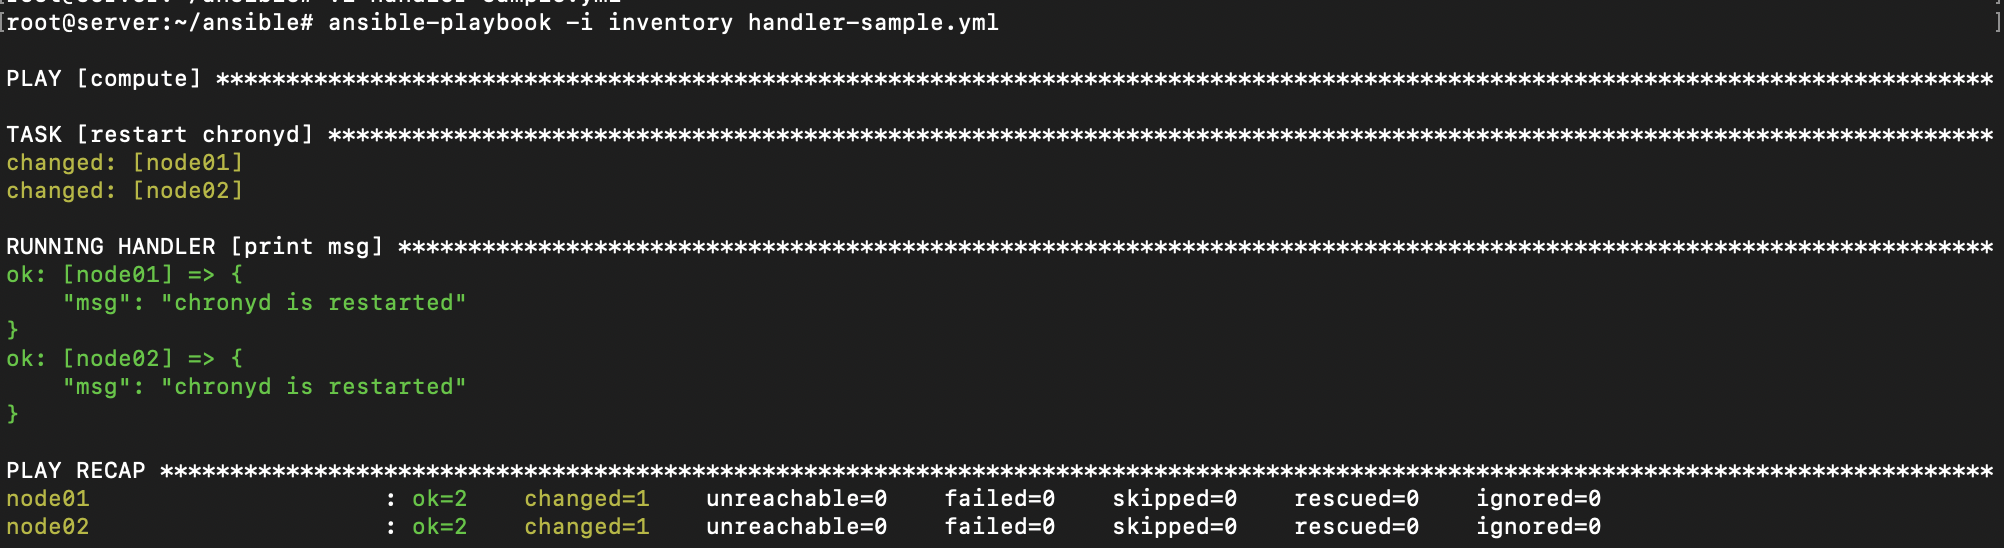
앤서블에서 핸들러를 사용하려면 Notify 문을 사용하여 명시적으로 호출된 경우에만 사용할 수 있다.
hander-sample.yml
---
- hosts: compute
  tasks:
    - name: restart chronyd
      ansible.builtin.service:
        name: "chronyd"
        state: restarted
      notify:
        - print msg

  handlers:
    - name: print msg
      ansible.builtin.debug:
        msg: "chronyd is restarted"
해당 task의 경우, chronyd restart task가 실행되면 notify 키워드가 print msg라는 핸들러를 호출하고 핸들러가 이에 응답해 handlers에 정의된 작업이 실행된다.
이때 핸들러는 같은 이름으로 여러 개의 핸들러를 정의하는것 보다 고유한 이름을 사용하여 정의하는것이 좋다.
작업이 실패된 경우 앤서블은 일반적으로 그 뒤의 모든 task를 건너뛰고 플레이를 종료한다. 만약 ignore_errors 라는 키워드를 사용하면 작업을 실패하여도 그 뒤의 task를 계속해서 실행할 수 있다.
ignore-example.yml
---
- hosts : compute

  tasks:
    - name: Install ntp-server
      ansible.builtin.yum:
        name: ntp-server2
        state: latest
      ignore_errors: yes

    - name: Print msg
      ansible.builtin.debug:
        msg: "Before task is ignored"
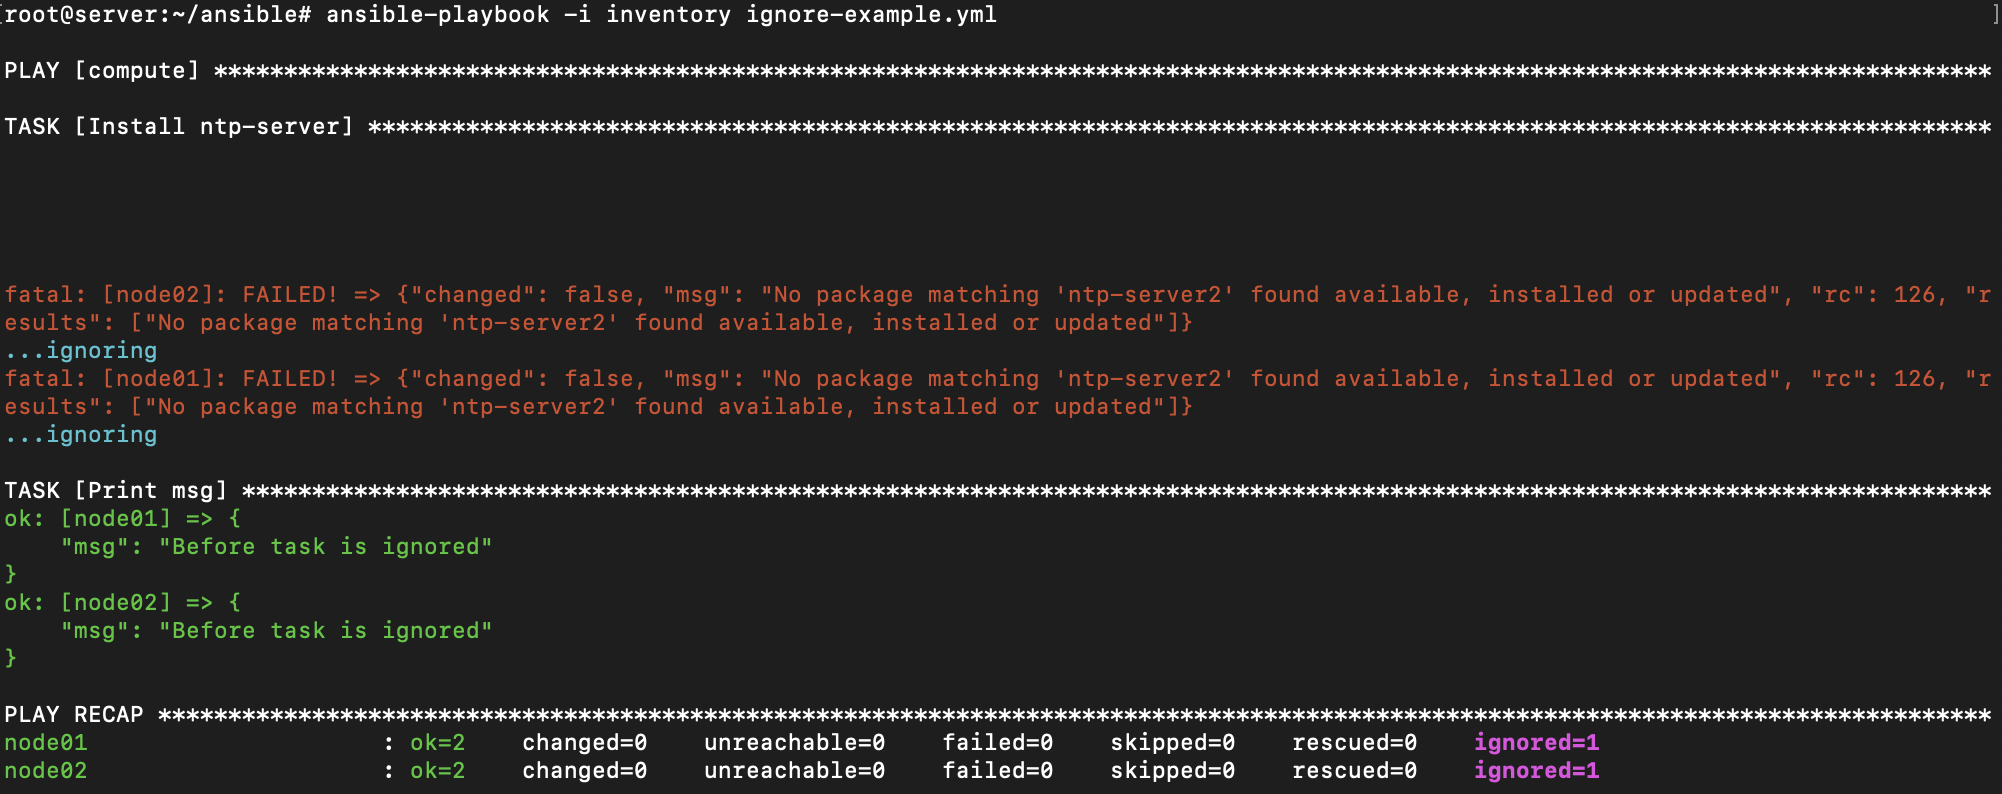
ignore_error를 yes로 바꾸어주자, 설치가 실패하여도 핸들러로 넘어가 msg를 출력하는 모습을 볼 수 있다.
play recapdptjeh ignored 카운트가 올라갔다.
앤서블은 block이라는 문법을 사용하여 오류를 제어한다. block은 task를 논리적으로 그룹화 하며 task 실행을 제어할 수 있다.
그리고, blcok을 통해 rescure와 always를 함께 사용하여 error 상황에 따른 task를 정의할 수 있다.
- block : 실행할 기본 작업을 정의함
- rescure : block 절에 정의된 작업이 실패할 경우 실행할 작업을 정의함
- always : block 및 rescue 절에 정의된 작업의 성공 또는 실패 여부와 관계 없이 항상 실행되는 작업을 정의함
block-example.yml
---
- hosts: compute
  vars:
    logdir: /var/log/daily_log
    logfile: todays.log

  tasks:
    - name: Configure Log Env
      block:
        - name: Find Directory
          ansible.builtin.find:
            paths: "{{ logdir }}"
          register: result
          failed_when: "'Not all paths' in result.msg"

      rescue:
        - name: Make Directory when Not found Directory
          ansible.builtin.file:
            path: "{{ logdir }}"
            state: directory
            mode: '0755'

      always:
        - name: Create File
          ansible.builtin.file:
            path: "{{ logdir }}/{{ logfile }}"
            state: touch
            mode: '0644'
해당 yaml은 register의 msg에서 Not all paths라는 문구가 나온다면, 즉 /var/log/daily_log라는 디렉터리를 찾는 작업에 실패할 경우 작업을 실패할 경우에 실행되는 rescue절에서 file 모듈을 사용하여 directory를 생성하고, 실패 성공과 관련없이 무조껀 해당 directory안에 todays.log파일을 생성한다.
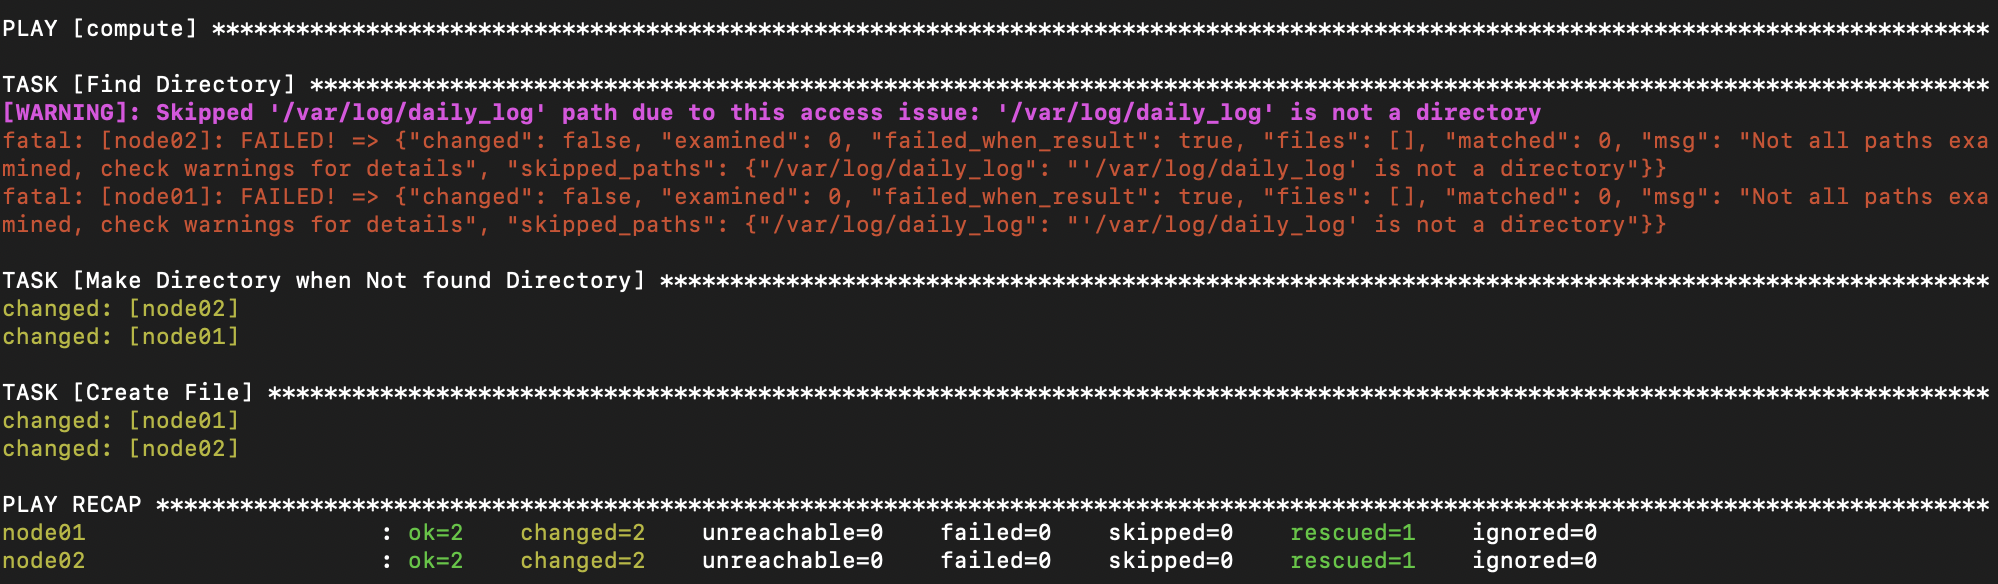
Find Directory fask에서 에러가 떨어져도 해당 상황에 맞게 task가 실행되었다.
Role
하나의 Playbook으로 호스트들을 관리한다면 규모가 점점 커지고, task가 많아질수록 관리하기 어려워지며 필요한경우 해당 task를 재사용하기 어려워진다. role을 활용하여 모듈화하여 관리하면 프로젝트의 규모가 커져도 협업 및 재사용하기 용이하다.
role은 ansible-galaxy role init 명령어를 통하여 기본 틀을 생성할 수 있다.
root@server:~/ansible# ansible-galaxy role init test-role
- Role test-role was created successfully
root@server:~/ansible# tree test-role/
test-role/
├── defaults # 해당 롤에서 우선순위가 낮은 Default로 사용할 변수를 정의한다.
│   └── main.yml
├── files # role에서 사용할 txt나 sh같은 파일을 배치할 수 있다.
├── handlers # 핸들러를 정의한다.
│   └── main.yml
├── meta # role의 dependency를 정의한다.
│   └── main.yml
├── README.md
├── tasks # 해당 Role에서 실행될 main task라고 생각하면 된다.
│   └── main.yml
├── templates # Role에서 사용할 탬플릿 .j2로 끝나는 파일을 배치한다.
├── tests
│   ├── inventory
│   └── test.yml
└── vars # 해당 롤에서 사용할 변수들을 정의할 수 있다.
    └── main.yml
우선 프로세스를 도출한 뒤 main task를 작성한다.
- 롤이 호출되면 현재 호스트의 운영체제 버전이 지원 운영체제 목록에 포함되는지 확인한다.
- 운영체제가 CentOS나 레드햇이면 httpd 관련 패키지를 dnf 모듈을 이용해 설치한다.
- 설치가 끝나면 제어 노드의 files 디렉터리 안에 있는 index.html 파일을 관리 노드의 /var/www/html 디렉터리에 복사한다.
- 파일 복사가 끝나면 httpd 서비스를 재시작한다.
./test-role/tasks/main.yml
---
# tasks file for test-role
- name: install service {{ service_title }}
  ansible.builtin.yum:
    name: "{{ item }}"
    state: latest
  loop: "{{ httpd_packages }}"
  when: ansible_facts.distribution in supported_distros

- name: copy conf file
  ansible.builtin.copy:
    src: "{{ src_file_path }}"
    dest: "{{ dest_file_path }}"
  notify:
    - restart service
해당 yamld
- 롤이 호출되면 현재 호스트의 운영체제 버전이 지원 운영체제 목록에 포함되는지 확인한다. -> install service task
- 운영체제가 CentOS나 레드햇이면 httpd 관련 패키지를 dnf 모듈을 이용해 설치한다. -> yum 빌트인 사용
- 설치가 끝나면 제어 노드의 files 디렉터리 안에 있는 index.html 파일을 관리 노드의 /var/www/html 디렉터리에 복사한다.-> files 디렉터리에 index.html파일 생성필요.
- 파일 복사가 끝나면 httpd 서비스를 재시작한다. -> handler 사용
./test-role/files/index.html
echo "Hello! Ansible" > files/index.html
index.html파일 생성
./test-role/handlers/main.yml
---
# handlers file for test-role
- name: restart service
  ansible.builtin.service:
    name: "{{ service_name }}"
    state: restarted
handler 작성 notify를 통해 호출됨. service 모듈을 활용하여 service재시작
./test-role/defaults/main.yml
echo 'service_title: "Apache Web Server"' >> defaults/main.yml
default 변수 작성 해당 변수는 재정이 될 수 있음. service_title을 외부로부터 받아 재정의 가능
./test-role/vars/main.yml
---
# vars file for my-role
service_name: httpd
src_file_path: ../files/index.html
dest_file_path: /var/www/html

httpd_packages:
  - httpd

supported_distros:
  - CentOS
여기에 지정되는 변수는 수정불가함. 롤 내 플레이북에서만 사용되는 변수로 지정되는것이 좋음.
롤 실행을 위한 플레이북 정의
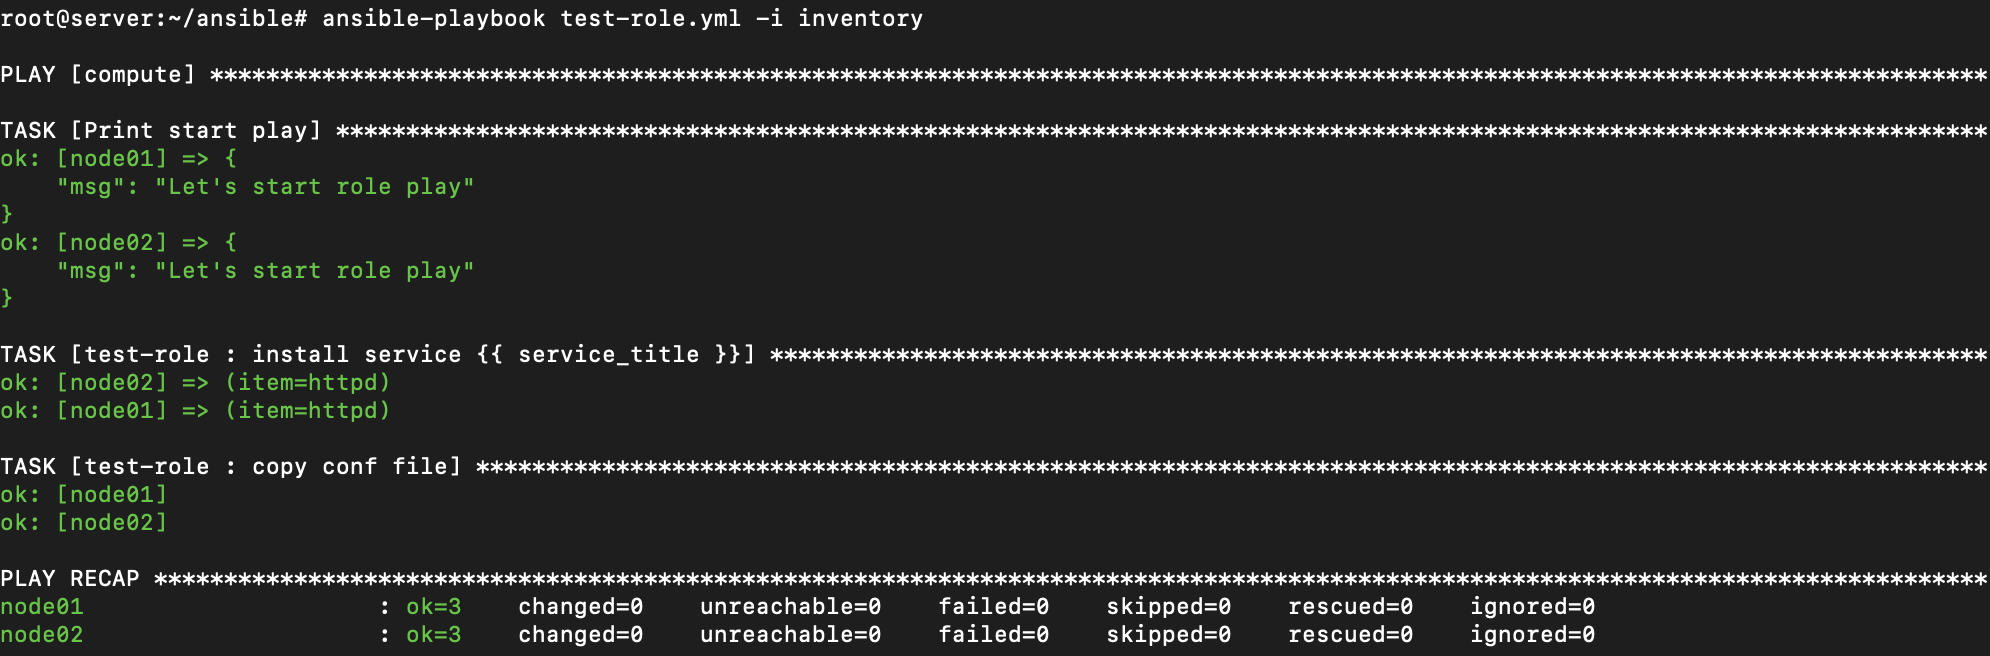
test-role.yml
---
- hosts: compute

  tasks:
    - name: Print start play
      ansible.builtin.debug:
        msg: "Let's start role play"

    - name: Install Service by role
      ansible.builtin.import_role:
        name: test-role
플레이북 실행