Ansible User 모듈을 이용한 사용자 계정 생성
AWS로 실습 후 개인 환경에서 다시 복습.
ansible.cfg, inventory 파일 작성
ansible/20240203/ansible.cfg
[defaults]
inventory = ./inventory
remote_user = centos
ask_pass = false

[privilege_escalation]
become = true
become_method = sudo
become_user = root
become_ask_pass = false
sudo 권한으로 명령을 실행하기 위해 ansible.cfg 작성
ansible-vault 를 이용한 사용자 계정 정보 생성
root@server:~/ansible/20240203# ansible-vault create 1/vars/secret.yml
New Vault password: #비밀번호 입력
Confirm New Vault password:

#에디터 창이 열림. user_info 변수에 원하는 계정 정보 입력.

---

user_info:
  - userid: "ansible"
    userpw: "rkawkRkd1!"
  - userid: "stack"
    userpw: "rhrnakRkd1!"


# 변수 파일 생성확인.

root@server:~/ansible/20240203/1/vars# pwd
/root/ansible/20240203/1/vars
root@server:~/ansible/20240203/1/vars# ls -al
total 12
drwx------ 2 root root 4096 Feb  2 22:58 .
drwxr-xr-x 3 root root 4096 Feb  2 22:59 ..
-rw------- 1 root root  743 Feb  2 22:58 secret.yml
플레이북 작성
모든 호스트에 동일하게 생성, vault로 작성된 변수 파일 사용.
/root/ansible/20240203/1/create_user.yml
---

- hosts: all

  # vault로 사용자 계정 관련 변수를 import하여 사용함.
  vars_files:
    - /root/ansible/20240203/1/vars/secret.yml

  tasks:
  # loop 문을 사용하여 user_info의 userid와 userpw 사용
  - name: Create user
    ansible.builtin.user:
      name: "{{ item.userid }}"
      password: "{{ item.userpw | password_hash('sha512', 'mysecret') }}"
      state: present
      shell: /bin/bash
    loop: "{{ user_info }}"
syntax check를 통한 문법 확인
# --syntax-check 옵션으로 플레이북 문법 확인 가능
root@server:~/ansible/20240203/1# ansible-playbook --syntax-check create_user.yml
[WARNING]: provided hosts list is empty, only localhost is available. Note that the implicit localhost does not
match 'all'
playbook: create_user.yml
# 에러 로그를 통해 inventory가 제대로 import 되지 않은것을 알 수 있음.
# inventory 파일을 지정해 주거나, 프로젝트 root 디렉토리에서 실행
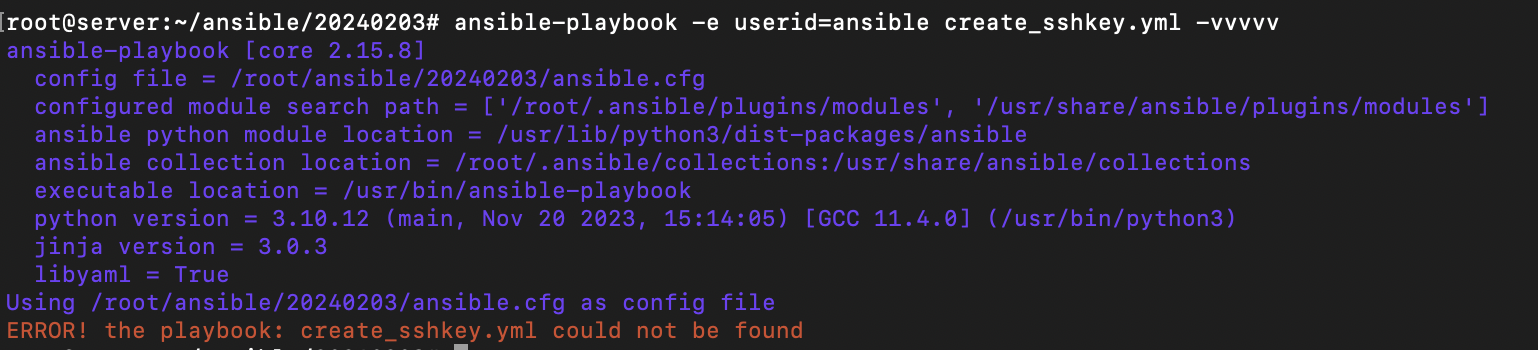
root@server:~/ansible/20240203# ansible-playbook --syntax-check 1/create_user.yml
playbook: 1/create_user.yml
이런식으로 playbook이름만 뜬다면 syntax check 통과.

엔서블 실행.
SSH키 생성 및 복사
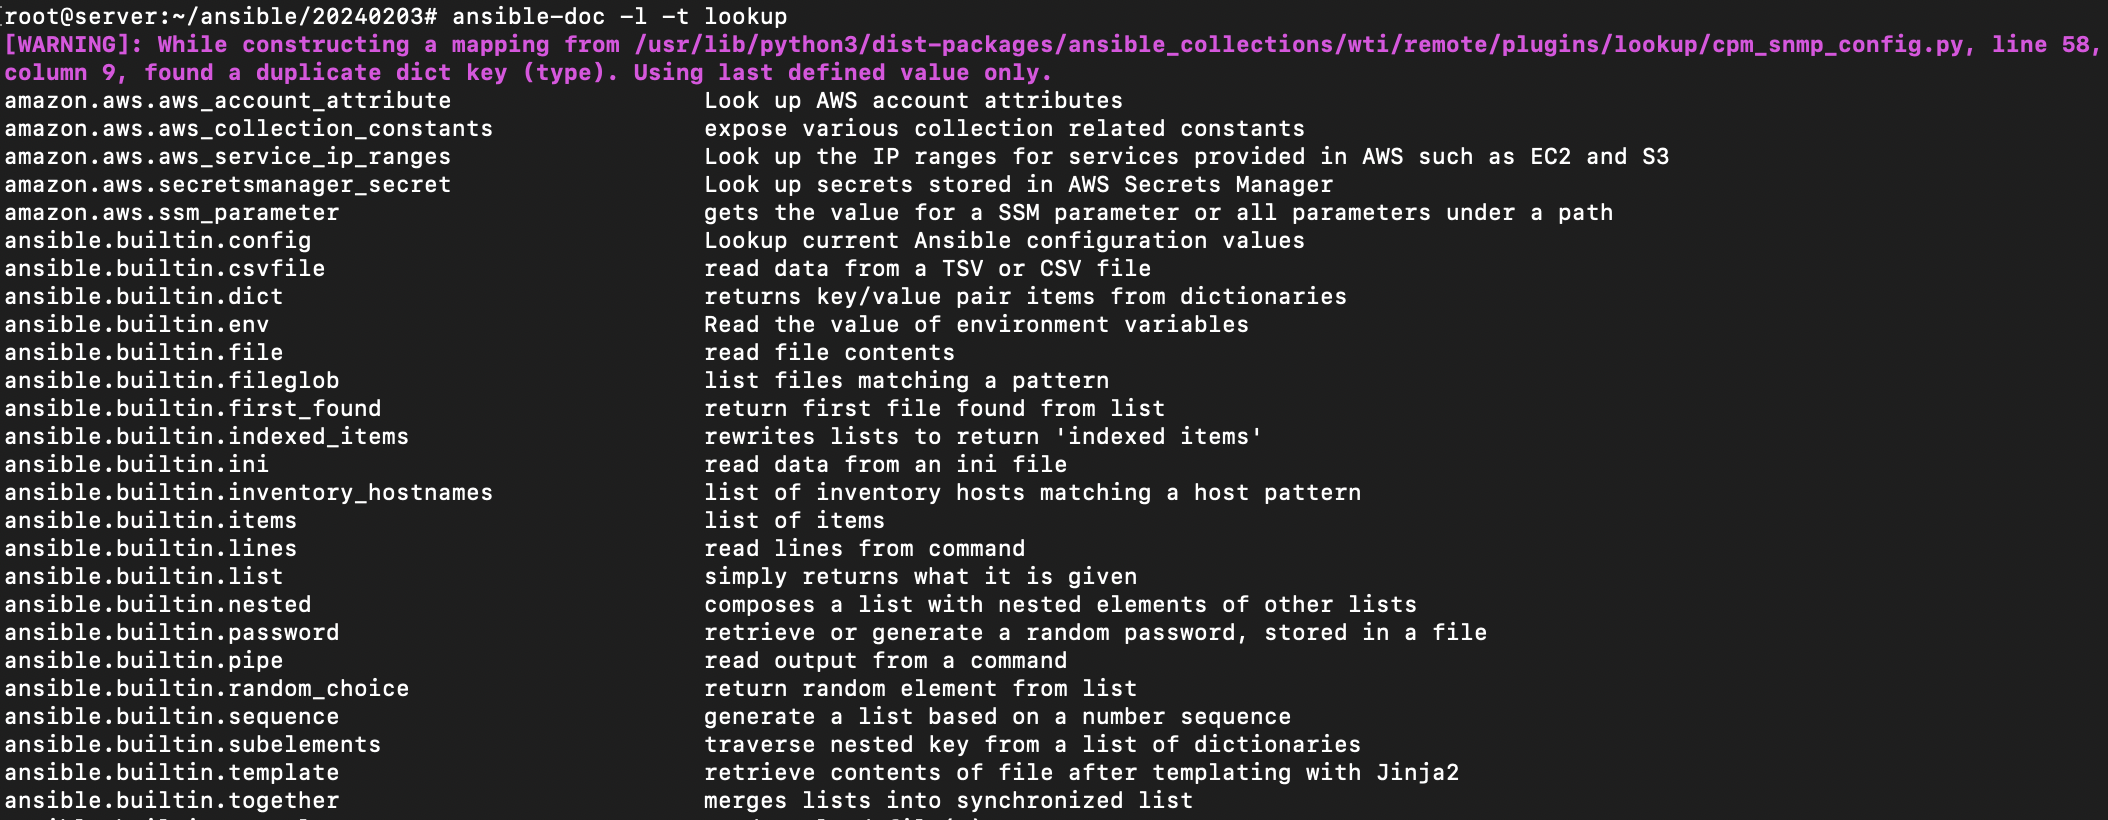
#  ansible-doc -l -t lookup 명령어로 사용 가능한 플러그인 확인.

root@server:~/ansible/20240203# ansible-doc -l -t lookup
플레이북 생성
/root/ansible/20240203/2/create_sshkey.yml
---

- hosts: localhost
  tasks:
  - name : Create ssh key
    ansible.builtin.user:
      name: "{{ userid }}"
      generate_ssh_key: true
      ssh_key_bits: 2048
      ssh_key_file: /home/{{ userid }}/.ssh/id_rsa
      shell: /bin/bash

- hosts: compute
  tasks:
  - name: Copy SSH Pub key
    ansible.posix.authorized_key:
      user: "{{ userid }}"
      state: present
      key: "{{ lookup('file', '/home/{{ userid }}/.ssh/id_rsa.pub') }}"
localhost에서 키 생성 후 원격지의 authorized_key에 복사
syntax check
root@server:~/ansible/20240203# ansible-playbook --syntax-check 2/create_sshkey.yml

playbook: 2/create_sshkey.yml
플레이북 실행.

추가 )
엔서블도 -vvv 벌버스를 줘서 Log레벨을 조정해 출력할 수 있다. 디버깅 할때 편함.
파일 확인
root@server:~/ansible/20240203# sudo ls -l /home/ansible/.ssh/id_rsa.pub
-rw-r--r-- 1 ansible ansible 409 Feb  3 00:16 /home/ansible/.ssh/id_rsa.pub
ssh키 생성 테스트

ansible 계정 전환 후 키 생성 확인

ansible에서 지정한 그룹 [compute] node01, node02 는 정상적으로 결과 출력하지만, node03은 키를 저장해두지 않아 비밀번호 요구.
관리 노드에 ansible 계정에 NOPASSWD:ALL 설정 (sudo 권한으로 명령어 실행 필요함.)
/root/ansible/20240203/2/sudo-ansible.yml
---
- hosts: compute

  tasks:
  - name: Create file
    ansible.builtin.file:
      path: /etc/sudoers.d/ansible
      mode: '0600'
      state: touch

  - name: Edit file
    ansible.builtin.lineinfile:
      path: /etc/sudoers.d/ansible
      line: ansible ALL=(root) NOPASSWD:ALL
참고) lineinfile모듈 (text 편집)
ansible.builtin.lineinfile module – Manage lines in text files — Ansible Documentation
ansible.builtin.lineinfile module – Manage lines in text files — Ansible Documentation
ansible.builtin.lineinfile module – Manage lines in text files Note This module is part of ansible-core and included in all Ansible installations. In most cases, you can use the short module name lineinfile even without specifying the collections keyword
docs.ansible.com
결과

ansible 계정 전환 후 관리노드 확인 및 sudo 테스트

NTP 서버 설치 및 설정.
ansible 계정을 생성하였으므로 ansible 계정 활용

ansible 계정 전환 후 프로젝트 폴더 생성
/home/ansible/ansible-project/3/ansible.cfg
[defaults]
inventory = ./inventory
remote_user = ansible
ask_pass = false
roles_path = ./roles

[privilege_escalation]
become = true
become_method = sudo
become_user = root
become_ask_pass = false
/home/ansible/ansible-project/3/inventory
[compute]
node01 ansible_host=192.168.122.231
node02 ansible_host=192.168.122.132

[control]
node03 ansible_host=192.168.122.245


[db]
node04 ansible_host=192.168.122.63
role 생성
ansible@server:~/ansible-project/3$ ansible-galaxy role init --init-path ./roles myrole.chrony
- Role myrole.chrony was created successfully
/home/ansible/ansible-project/3/roles/myrole.chrony/vars/main.yml
---
# vars file for myrole.chrony

package_name : chrony
service_name : chronyd
fedora_os:
 - RedHat
 - CentOS
패키지이름, 서비스 이름 등 변수 추가.
/home/ansible/ansible-project/3/roles/myrole.chrony/templates/chrony.conf.j2
pool {{ ntp_server }}
driftfile /var/lib/chrony/drift
makestep 1.0 3
rtcsync
allow 192.168.0.0/16
local stratum 10
keyfile /etc/chrony.keys
leapsectz right/UTC
logdir /var/log/chrony
template에 chrony.conf 설정 추가.
/home/ansible/ansible-project/3/roles/myrole.chrony/handlers/main.yml
---
# handlers file for myrole.chrony

- name: Restart chrony
  ansible.builtin.service:
    name: "{{ service_name }}"
    state: restarted
핸들러에 서비스 재시작 테스크 추가.
메인 테스크 작성
---
# tasks file for myrole.chrony

- name: Import playbook
  ansible.builtin.include_tasks:
    file: "{{ ansible_facts.distribution }}.yml"

- name: Copy chrony config file when Ubuntu
  ansible.builtin.template:
    src: chrony.conf.j2
    dest: /etc/chrony/chrony.conf
  notify: "Restart chrony"
  when: ansible_facts.distribution == "Ubuntu"

- name: Copy chrony config file when Other OS
  ansible.builtin.template:
    src: chrony.conf.j2
    dest: /etc/chrony.conf
  notify: "Restart chrony"
  when: ansible_facts.distribution in fedora_os
facts를 참조하여 운영체제별로 chrony 설정 가능하게 task작성
ansible@server:~/ansible-project/3/roles/myrole.chrony/tasks$ cd /home/ansible/ansible-project/3/roles/myrole.chrony/tasks

ansible@server:~/ansible-project/3/roles/myrole.chrony/tasks$ touch RedHat.yml
ansible@server:~/ansible-project/3/roles/myrole.chrony/tasks$ touch CentOS.yml
ansible@server:~/ansible-project/3/roles/myrole.chrony/tasks$ touch Ubuntu.yml
운영체제별 플레이북 하나씩 작성
RadHat.yml
---

- name: Install chrony using dnf
  ansible.builtin.dnf:
    name: "{{ package_name }}"
    state: latest
CentOS.yml
---

- name: Install chrony using dnf
  ansible.builtin.yum:
    name: "{{ package_name }}"
    state: latest
Ubuntu.yml
---

- name: Install chrony using apt
  ansible.builtin.apt:
    name: "{{ package_name }}"
    state: latest
각 운영체제별로 패키지 설치방법이 다르니, 운영체제별 플러그인 설정
메인 플레이북 생성
/home/ansible/ansible-project/3/install_ntp.yml
---

- hosts: all
  roles:
    - role: myrole.chrony
      ntp_server: 0.kr.pool.ntp.org
플레이북 실행

'A101[1기]' 카테고리의 다른 글
| Ansible 스터디 4주차 - 보안설정 자동화 (0) | 2024.02.05 |
|---|---|
| Ansible 스터디 3주차 - 환경 설정 자동화 (0) | 2024.02.03 |
| Ansible 스터디 2주차 반복문과 조건문, 롤과 콘텐츠 컬렉션 (0) | 2024.01.19 |
| Ansible 스터디 1주차 엔서블 기본사용 (0) | 2024.01.11 |


